Final Shoot Evaluation

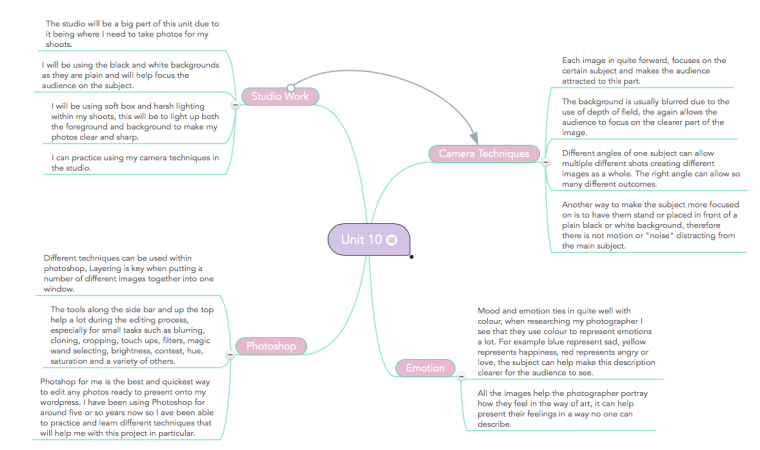
For my final shoot I was inspired by Lorena Cosba. As I explained in my shoot plan she photographed people showing different moods and emotions on their faces and had them printed on Polaroid type papers to present them. She then ripped parts of the top image out so that the bottom image was showing through. She picked two images that contrasted each other to go together. For example, one image may be of an older lady and the other would be of a younger women, the photos could be of the same person just of when they were younger to older and current. The Younger photo is in black and white meaning this theory is supported due to the photo being old and from the past where as the older woman photo is in colour as it is current. Another theory to add to this project is that the older woman, the current, present self is wanting to be young again, she is hiding behind the younger photo with part of her surest self peering and breaking through the rips in the photo. The feeling of not being good enough and wanting to be different occurs.

Remembering these pieces of information I was able to start my final shoot, I used Amber as my model and had her make different expressions that represented different moods and emotions, such as being sad, happy, angry or amused. I decided to mix it up a bit and have two parts towards this shoot, One part with a black background using lighting techniques and the other with a white background like Lorena Cosba originally used. For the first part I used a white background but due to the type of lighting and white boards used within the shoot, the outcome of the photos had a black background. I know it would had been easier to just use a black drop but I wanted to put some of my lighting skills that I have developed within this course to the test in this shoot. This part of the shoot was successful as the lighting turned out how I wanted it to, I want to change it up a bit and see how it would effect the pictures when having the model in front of a black background instead of white. As we have to present four final images I will have two of the mages using the black background and the other two images using the white background so they’re not all the same.

After examining each image I have then picked four pairs of pictures, these eight images contrast each other in their pairs so that when I rip the top image the bottom image will contrast through. I wrote them down and then paired them up with arrows matching them up.

IMG_2751.JPG

I printed out the eight different photos in their pairs and cut them out in the style of a polaroid pictures with the white borders. I then used a pin on the top image to poke through where I wanted the rip to start. I then took tweezers to rip the image as the tears were small and dainty and I didn’t want massive constructive rips.I ripped away the eyes, mouth and a part of the body. I then started my second shoot to capture the two images combined together to create the final one.


Four final Images:


I am quite happy with the outcome of my four final images a they turned out as I expected. I was able to improve this shoot as I had practice from my experimental shoot when I was still choosing what to do. However If I was to change anything I would have a consistent background colour of white through out all of my images. When it came to the editing stage of the photos the black background was hard to edit and didn’t look at good as the white background images did. If I was to do this project again I would pick a different experimental shoot to use as my final. I think I would do the painting one inspired by Shin Kwangho, I enjoyed doing the experimental shoot for this as I was able to use acrylic paints and brushes to create something colourful to represent mood and emotions.


Final Shoot Plan

For my final shoot I would like re-do my first experimental shoot, this was inspired by Lorena Cosba. She photographed people showing different moods and emotions on their faces and had them printed on Polaroid type papers to present them. She then ripped parts of the top image out so that the bottom image was showing through. She picked two images that contrasted each other to go together. For example, one image may be of an older lady and the other would be of a younger women, the photos could be of the same person just of when they were younger to older and current. The Younger photo is in black and white meaning this theory is supported due to the photo being old and from the past where as the older woman photo is in colour as it is current. Another theory to add to this project is that the older woman, the current, present self is wanting to be young again, she is hiding behind the younger photo with part of her surest self peering and breaking through the rips in the photo. The feeling of not being good enough and wanting to be different occurs.

To do this I am going to do a shoot using a model and use the contrasting effect again like I did in my experimental shoot. Like before I am going to take photographs of Amber where she is showing different moods and emotions that contrast each other. For example a Happy expression will be placed on top of a sad expression to show she may look like she’s happy however on the inside she is hurting and upset but this isn’t visible. You will then be able to see the sad features when I print out the images and rip parts of the top image out so that you can see the bottom image. I really like this technique as it involves both photography and bit of creative art based work.

In order to achieve this shoot I will take photos of amber in the studio using soft box lighting against two white walls to make the background black, I will then use just the soft box lighting against a white background so I had two sets of photos to play around with. I will then get her to make different expressions so I can use them to contrast against each other.

Experimental Shoot Plan 1

For the first experimental shoot I am going to use Lorena Cosba as my inspiration and create an image made up of three photos in total. I will take two different photos that contrast each other, Cosba used a young and old lady to achieve this contrasting technique. I may try this out however, I might use the theme of emotions and feelings and layer them on top of each other. Lorena Cosba printed them out and then layered them on top of each other, ripping sections from the top photo to show parts of the second photo underneath. As I like this idea and I am inspired by her work I will try this out and ut my own twist on it. For example, the top image is of my model with a happy expression upon her face, I will rip part of this image to show the second image underneath, revealing the same model but with a sad expression upon her face.  I will show that the photographs are layered, I won’t hide this aspect as it gives the photo more to look at from a viewers perspective, What is she trying to hide underneath? I also like the contrast between the coloured photo and black and white, I will use this effect in my own photos.

In order to achieve this shoot I will need a DSLR camera, Model, paper and printer. I would preferably like to shoot this in the studio as I would like soft box lighting so the final image is no too harsh. I will need no props for this shoot as it is just portrait photos of the model giving different facial expressions.

The final outcome I imagine should come out along the lines of this:

aca13f72816bb7d512c02452f6cc184c

Project Proposal

The fundamental reason for the project was to research different self art portrait photographs in order to get enough inspiration to create our own. Self Portraits are a representation of an artist that can be presented by a drawing, painting, photograph, or sculpture designed by that artist. The way they portray themselves is completely up to them and is the way they feel represents them the best. I will have researched a variety of different self art photos and analysed them in order to grasp the concept of how to create my own and what techniques i can use inspired by other photographers and artists.

We have been told to gather at least four different ideas to have a go at, this means I would need to plan four different shoots and evaluate them, breaking each one down and figuring out which one I would like to shoot again and use for my final shoot.

The first test shoot I am going to create an image made up of 3 photos in total, I will take two different photos that contrast each other, print them out and then layer them on top of each other, ripping sections from the top photo to show parts of the second photo underneath. this is inspired by Lorena Cosba. I will need a DSLR camera, Model, paper and printer.

The second shoot I have in mind is to take a portrait photo of someone and print it out. From this I will sketch the outline of the person using a charcoal pencil, I will then fill in the face area using a variety of coloured acrylic paints that represent the mood of the person. I will then photograph the final artwork and present it on my blog. This will be inspired by Artist Shin KwangHo. In order to achieve this I will need a DSLR Camera, Model, Artist paper, paint brushes, acrylic paint, charcoal pencils.

The third shoot that I am going to do is take multiple portrait photos of someone with different expressions on their face. I will then upload them to photoshop and pick the best photos, with these photos I will pair them together with the correct colour that represents the mood. Ie: blue- sad, red- angry. This will be inspired by Lisa Leverseidge. In order to achieve this photo shoot I will need a DSLR camera, Model and photoshop.

For my final experimental shoot I am going to do a similar thing that I did previously in shoot three however I am going to mix it up a bit by adding props. I am going to take photographs of my model with things they love or hate and then upload them to photoshop. Here I will cut up each section of different photos focusing on the head, eyes and lower half of the body. I will colour each section depending on mood and emotions that the model is feeling. This is inspired by Rob Pruitt. I am going to need a DSLR camera, model, props and photoshop in order to achieve this shoot.

I will be tracking what I do in this project by making posts and keeping a form of written diary so I know where I am at and what I have to catch up with. This way I can track my progress that I am achieving in this unit. I will plan each shoot and then evaluate showing contact sheets as proof that I have completed the shoot. Each shoot will help narrow down what one i want to do for my final. I will showcase each experimental shoot on my wordpress website on the end of each editing post, this post will show how I have edited the photo and what steps I had to take in order to achieve this.

Case Study – Photographer Research

Francis Bacon

Francis Bacon is an artist who is best known for his analysis he carries out for his next painting or creation. Bacon would paint self portrait of models and friends but would distort their faces and accentuate their facial features. This would result in the final image being quite disturbing to look at and inhumanly possible.

Francis Bacon is one artist in particular that prefers to sketch from a photograph instead of being face to face with the subjected model. There are no images that could be found to visually back up this information, however I researched into a few websites and found a clear statement that came from Bacon himself. He goes on to explain how he’d use damaged photographs of his friends that he could paint from, he prefers being alone whilst painting as he feels more free. He continued to explain how it’s easier to work from photographic records as he can really get into depth with the facial features and make the final portrait more detailed and unique. Here is the exact quote:

“…there are these photographs scattered about the floor, all damaged. I’ve used them to paint portraits of friends, and then kept them. It’s easier for me to work from these records than from the people themselves, that way I can work alone and feel much freer. When I work, I don’t want to see anyone, not even models. These photographs were my aide-memoire, they helped me to convey certain features, certain details.”

It sounds as if he would discard of the photographs hat he painted from after as painting is a true collection of records for him. Photographs are just visual representations of memories and you can’t change them, where as a painting can be taken into perspective and you can change any detail you want whether it’s a big difference or very minimal.

Shin KwangHo

Shin KwangHo is an Artist that I have previously looked at when researching into Self Art Portrait photography. I have only looked into two images of his whilst doing so, therefore thought it would be a good idea to look into more of his artwork to grasp the concept of his work so when it comes to creating my own I can live up to his standards and make him and Bacon a big influence to my project.

I love these images and the message they put across, they are ever so simple as the coloured acrylic paints represent the moods and emotions of the person in the image. There isn’t much to the person it’s self apart from a few sketchy lines to show the silhouetted head, shoulders, neck and hair at the most. The sketched lines are quite thick and not a lot of detail have gone into this as Shin wanted the audience attracted to the multicoloured face. In the majority of each photo, Shin has used circular motions with his brush to create eye ball sockets to show where the eyes would be, he tried to make the image inhuman but still add the eye placement to give that normality effect. The image focus on the eyes if anything. The difference in brush strokes bring attention to the eyes straight away. No matter how messy the painting and drawing is, the small details allow the audience to see it is a person with emotion.

When researching Self art portraits for my project, a certain few images for Shin KwangHo stood out to me the most, He would sketch out the outline using a charcoal pencil. He would then fill in the face area using a variety of different coloured acrylic paints, these colours would represent the emotions of the subject. To incorporate this idea into Francis Bacon’s concept I will take a photograph of my subject model and print it out, this will be my guide when sketching out a black charcoal outline of a person, just like he did. I will then use acrylic paints to emphasis the emotions the model is feeling. Both artists like to distort the facial features of the person, something I would like to have a go at when creating my own self art portrait. My final outcome will have inspiration from both Shin KwangHo and Francis Bacon.


References;

http://www.phhfineart.com/articles/francis_bacon.html

https://en.wikipedia.org/wiki/Shin_Kwangho

Self Artist Imagery Moodboard & Analysis

This project is to do with self art, A self-portrait is a representation of an artist that can be presented by a drawing, painting, photograph, or sculpture designed by that artist. The way they portray themselves is completely up to them and is the way they feel represents them the best.

Lorena Cosba – Mixed Media

aca13f72816bb7d512c02452f6cc184c

As a self art photographer, Lorena Cosba has decided to portray her self portrait by taking two photos of different people and layering them on top of one another. This has been clearly shown at the bottom of the photograph where you can see two Polaroids have been placed on top of each other. The top photo has then been ripped apart revealing the second photo underneath. She has decided to do this practically and not on photoshop to give the final photo more effect. To make this final outcome it would have resulted in her taking a total of three pictures; two portraits and one picture of the final design. The top photo is on a young women with a straight face, hair in a pony tail and in black and white. The bottom photo is of an old lady with grey hair, wrinkled skin and in colour. This suggests that the black and white photo is of the older lady when she was younger. The tears in the photo could suggest that she wishes she was younger but her real, ‘old’ self is current and there is no hiding from that.


Andy Warhol – Artist

andy-warhol-self-portrait-1978-art-auction

Andy Warhol is a famous artist who has previously presented a few different self portraits. This one for example caught my eye when looking into Self Art. There is up to three different images within one painting, this can be both confusing and intriguing to the viewer. Black is the most dominating colour within this full painting so your eyes are straight away fully drawn to the outlines of his face. The pale background trails behind and leaves just a hint of colour to make the painting more lively. His work was set back in an era where colour was popular and bright, he would have included this in his paintings. He would have painted the coloured background before painting the self portrait on top of it. The many faces of one person could suggest different feelings they could have felt. It could also suggest he was a very bipolar man with different thoughts at different times. Each face painted is looking in different directions, this could portray Warhol as a very confused man.

Chamo San- Artist

48abd7167f7e0ffb7de8beec06a2b2ef

Chamo San has portrayed his self portrait by taking a photograph and then drawing it on paper. I think this is how he has created his self portrait because to draw anything you would need a picture reference and the best way to reference yourself is to take a photograph. He has cut his portrait into section creating a Kaleidoscope effect making the picture more appealing and interesting to the public eye. I believe he has drawn this photo with a blue ball point pen due to the colour of the final drawing piece. I could be wrong however, due to the fine lines and detail to create this drawing I reckon it was a pen. He would have then taken a photograph of the final outcome to present to his audience.

Shin KwangHo- Painter

Shin KwangHo has decided to present her self portrait by drawing the outline of the person with a jet black charcoal and fill the face with a range of different coloured acrylic paints. This is one of my favourite pieces that I have looked at so far as the dark, plain background and charcoal outline contrasts with the bright acrylic paint colours. I like this design in particular as each colour used to fill in the face could represent a different emotion or feeling. For example; red- angry, blue-sad, yellow- happy, green- jealous. There is then part of the paint that have been blended together as the different paints collide when placed on the drawing. This could suggest all of her moods, feelings and emotions coming together to represent her as a person. There is no facial features, the colours represent the moods that are upon her face, therefore there is no need for features as you can guess from the colours. The colour used in this painting really grabs the viewers attention, it makes the dull charcoal drawing stand out and give you something to look at. To capture his final outcome he would have had to photograph it, there would have been no editing software used apart from if he wanted to enhance any colours however I doubt this was the case. This would be a piece I would like to have a go at when having a go at my own self portrait project.

Lisa Leverseidge- Photographer

cc5c80b9730a1e77652806a74ba4db13

Lisa Leverseidge started off her photography career by taking self portraits which then lead her to her love of photography and proceeded into fashion photography. This image in particular as been made with at least six different photographs to make the one photo. Each photo have been cut up into pieces and blended into each photograph and been coloured differently. There are no harsh lines in the photographs them self and is a little confusing to the public eye as you don;t know where each image stops and starts.There are no two photos the same as the model is looking in a different direction each time. The directions the model is looking in the colour it has been washed over with could suggest different feelings and emotions. For example, you can see in the blue section that the model is looking to the left and down to the ground, blue represent sadness- the pose and colour combine to give the public the emotions she is feeling. The same goes for the Red section;  the model looks like she is scowling at the camera, she of course has been paired with the colour red which can represent anger. To achieve this photograph she would have taken six different photos, layered them on top of each other on photoshop, played around with the opacity so that they are visible still through each image and slightly coloured with hue and saturation.

Rob Pruitt- Photographer

Rob-Pruitt-Exquisite-Self-Portrait-Princess-Me-2010.png

Rob Pruitt has produced a self portrait piece that is made up with at least three different images. This image in particular is called “Princess Me”, this could suggest that he has a very feminine side and decides to represent this by including three different objects in each section; a tiara, butterfly and rose. I feel that each section has been colour a particular colour for a reason. For example, the top section of the his head wearing a tiara is coloured a light purple/lilac, a very feminine colour. The middle section has been coloured a very rich yellow, a butterfly can represent being free, yellow can represent happiness, combining these two things together can make the middle represent him being happy and free, not being judged for using feminine objects when he is a male. the bottom section is red, red can represent danger, however because he is holding a rose straight away I think the red in this case is representing love.

MoodBoard:


Mindmap:

Screen Shot 2016-11-14 at 15.19.29.png


Picture Analysis

dimensionred

This photo could have been taken to promote a DJ set taking place at a nightclub. This image could be a part of a poster used to advertise this. The image has used depth of field as it focuses on the hands and decks and blurs out towards the distance of the knobs in the background. Within the photo the decks are shown which are a professional piece of DJ equipment resulting in good quality music and sound, this would be another reason people would attend the club due to better sounds and DJ sets. This picture covers all elements of a club due to close views of the decks yet still catching a glimpse of the dance floor on the far left, this part of the photo is full with people so this can also show it is a popular club. The red is the main colour of the dance floor within the photo, red is a dominant colour making this part of the photo stand out more tun the rest. The dark decks contrast with the bright colours of the surrounding lights, this will make the photo attractive to the public eye. The more attractive the photo is the more it will persuade people to attend the club. The photographer would have a certain amount of time to take each photo due to the movement within the scene, it would be shot at f/30 at least to get a strong amount of colour and crisp, sharp imagery. The overall photo would have nada use of white balance to make sure all the colours were evenly distributed and weren’t just focused and bright in one part of the photo.